Tutorials
How to Make a Quilted Oven Mitt — Free Sewing Pattern and Tutorial
Sep
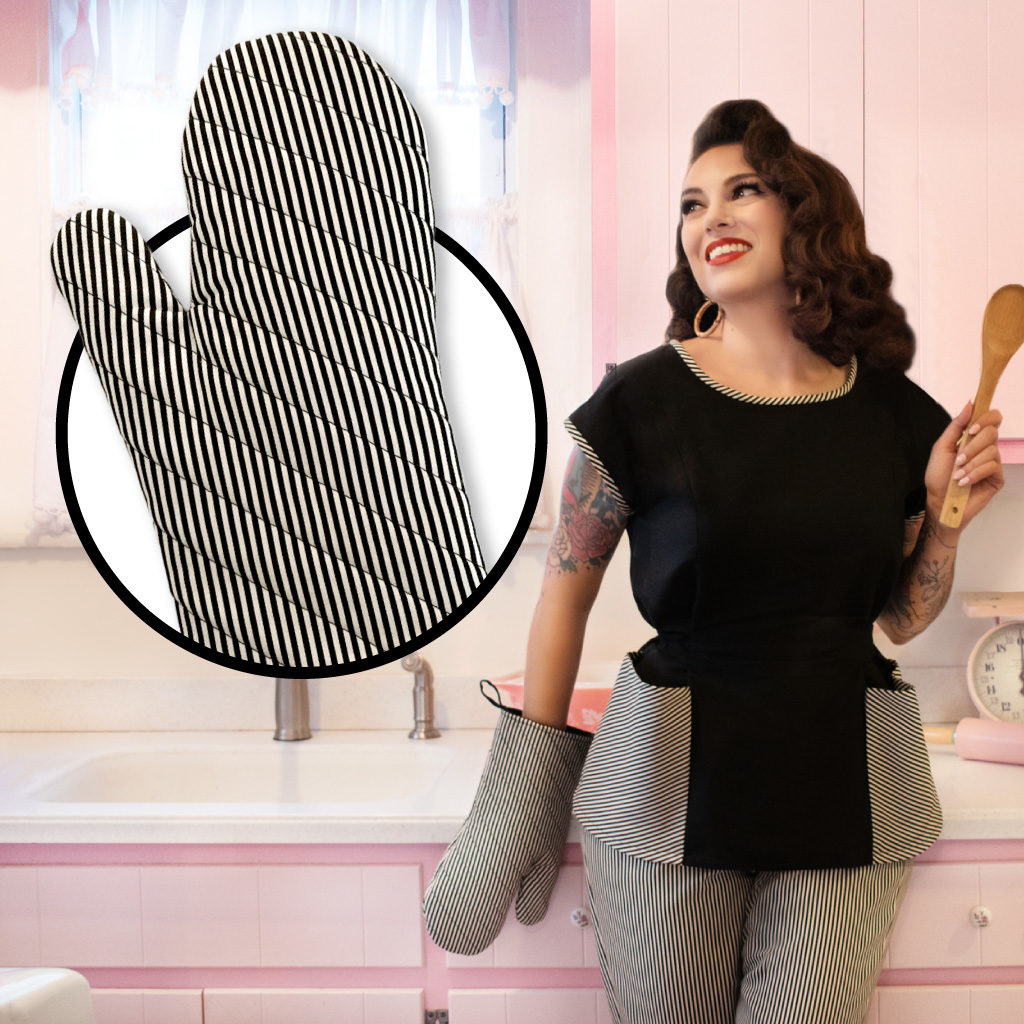
Hi, everyone! We’ve created a bonus tutorial for those of you looking to complete your June Cleaver fantasy (or just complete your outfit!). Our free oven mitt pattern pairs great with the Cobbler Dress and Set (available on Patreon), and makes for great gifts, too. With no shortage of great novelty prints, you’ll find just the thing for your kitchenette. And the best part? It comes together so quickly! But don’t tell anyone, or they’ll be asking you for one, too. Happy sewing!
xoxo,
Melisha
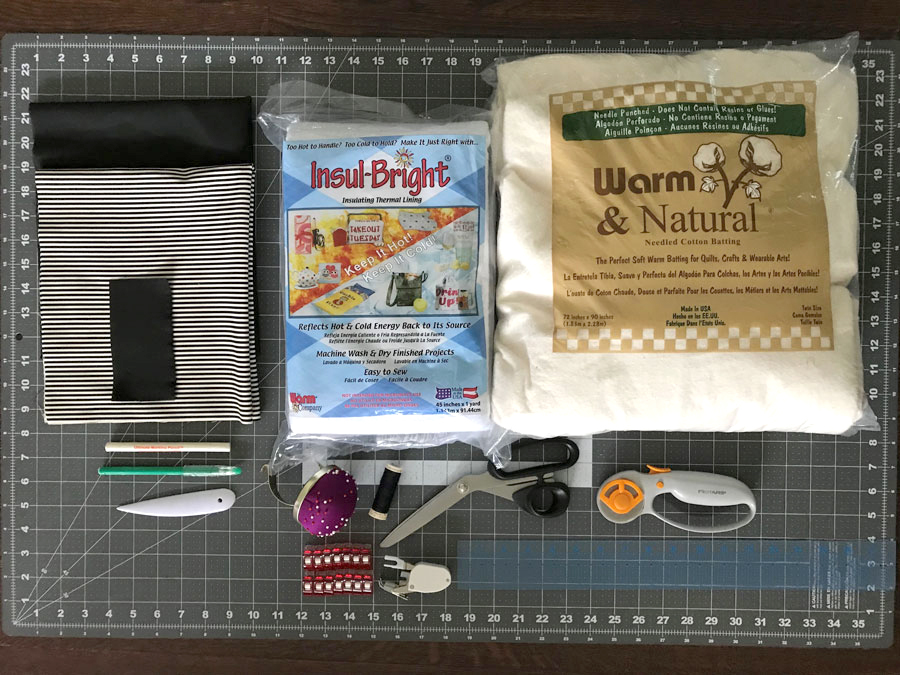
Materials
- Free oven mitt pdf pattern download
- ½ yard 100% cotton fabric for exterior
- ½ yard 100% cotton fabric for lining
- ½ yard Insul-Bright insulated batting
- ½ yard cotton batting
- Basic sewing kit including fabric shears or rotary cutter and mat, straight pins, fabric marking tools, a ruler, and point turner or chopstick
- Wonder Clips or safety pins
- Fabric marking tool
- Thread to match your fabric
- Sewing machine and iron
- Walking foot (optional)
NOTE: Please make sure to use 100% cotton fabric for your oven mitt project because synthetic fabrics will melt when handling very hot items.
Resources
Instructions
1. Cut your fabric and batting using the following dimensions:
- Exterior fabric: cut one piece 18 in x 21-in
- Lining fabric: cut one piece 18 in x 21 in and cut one piece 2½ in by 5 in for the loop
- Insul-Bright insulated batting: cut one piece 18 in x 21 in
- Cotton batting: cut two pieces 18 in x 21 in
2. Draw quilting lines on your exterior fabric: quilting your oven mitt helps keep everything together and is a great way to personalize and add some pizzazz to it. You can draw swirls, diagonal lines, traditional quilting squares or free-hand any design you like. I decided to draw diagonal lines on my exterior fabric using a ruler and fabric marking tool, keeping the lines one inch apart. I used my FriXion erasable pen with ink that disappears with heat.


3. Make a quilt sandwich: layer your exterior fabric and batting pieces together as follows:
- Bottom layer: two pieces of cotton batting 18 in x 21 in
- Middle layer: one piece of Insul-Bright 18 in x 21 in, shiny side up
- Top layer: one piece of exterior fabric 18 in x 21, right side (RS) up


4. Sew your quilt sandwich: use Wonder Clips or safety pins all the way around the quilt sandwich to hold all the layers together. Start sewing, following the quilting lines from the middle of the sandwich and working your way out. Make sure everything is smooth and remove the clips or pins as you get to them.


Tip: Because this quilting sandwich is pretty thick and may still want to shift around, I find it very helpful to sew using a walking foot. The walking foot evenly feeds the layers of fabric and batting through the machine by gripping onto the top layer of fabric and helps move it under the needle at the same pace that the machine's feed dogs are moving the bottom layer of batting. This foot is optional but super helpful.


5. Cut out the oven mitt: place your oven mitt pattern RS up on top of the quilted sandwich and pin in place. Cut out the oven mitt shape using a rotary cutter and mat or scissors. Flip your pattern over so it is wrong side (WS) up and place it on the quilted sandwich again to cut out another oven mitt shape. You should have two oven mitts cut out reflecting each other. Trace the stitching line that indicates the pivot point for the thumb onto the WS of your oven mitt pieces.


6. Sew the oven mitt: place oven mitt pieces RS together and secure using Wonder Clips. Stitch around oven mitt using ⅝-in seam allowance, leaving bottom edge unsewn. Make sure to follow the stitching line that indicates the pivot point for the thumb.


7. Trim seam allowance down to ¼ in and clip to the stitching at the pivot point, making sure not to clip through the stitching. Trim away excess fabric between the thumb and finger areas. Turn the oven mitt RS out, poking out thumb and finger areas with a point turner or chopstick; press.


8. Cut out oven mitt lining: using oven mitt pattern, cut 2 pieces out of lining fabric. Transfer the stitching line pivot point onto the WS of one of the lining pieces.

9. Sew oven mitt lining: pin lining fabric RS together and sew using ⅝-in seam allowance and leaving bottom edge unsewn. Make sure to follow the stitching line that indicates the pivot point for the thumb. Leave a 4-in opening on one edge of lining so that you can turn oven mitt RS out. Trim seam allowance down to ¼ in, avoiding trimming the seam allowance at the opening. Notch around curves and clip to the stitching at the pivot point, making sure not to clip through the stitching. Trim away any excess fabric between the thumb and finger areas.


10-Make oven mitt loop: take the 2½ in x 5 in piece of fabric and fold it in half lengthwise, WS together, and press. Turn the long raw edges of the fabric to the WS so that they meet at the crease. Press. Fold loop in half lengthwise, bringing pressed edges together, and press. Finish by topstitching along both long edges.


11. Sew lining and loop to oven mitt: with quilted oven mitt turned RS out and mitt lining WS out, place the oven mitt on your hand and insert the lining over the oven mitt, RS together, matching bottom raw edges. Fold oven mitt loop in half and pin it in between the lining and the oven mitt, with raw edges meeting, aligning it at the bottom raw edge next to the seam opposite the thumb.


12. Stitch around the bottom opening of the mitt from the lining side. Trim seam allowance to ⅛ in. Turn the oven mitt RS out through the 4-in opening in the lining.


13. Topstitch the 4-in opening closed, making sure not to catch the outer fabric in the stitches. Push the lining all the way inside the oven mitt, making sure to match the finger and thumb areas. At the bottom of the oven mitt, roll the lining to the inside and pin in place. Topstitch ¼ in around the bottom of the oven mitt from the lining side to secure.


Enjoy your cute new quilted oven mitt!