Halloween Extravaganza
Rockford Peaches Halloween Costume, Part One: Adapting the Pattern
Oct
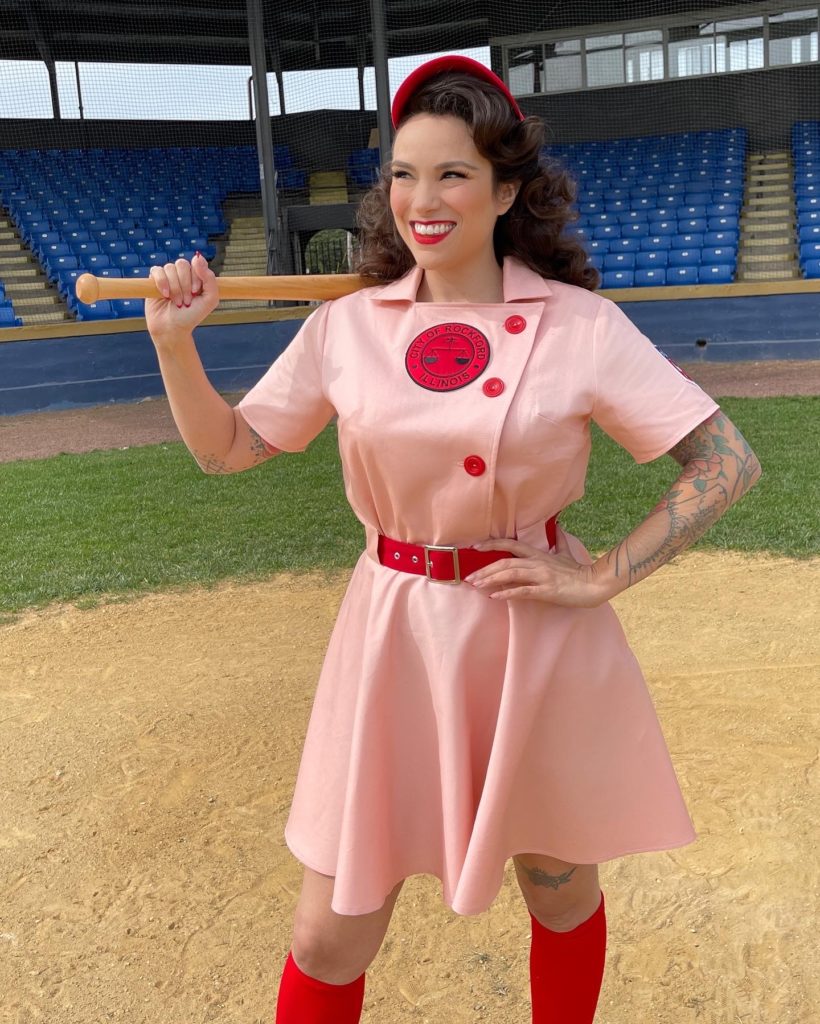
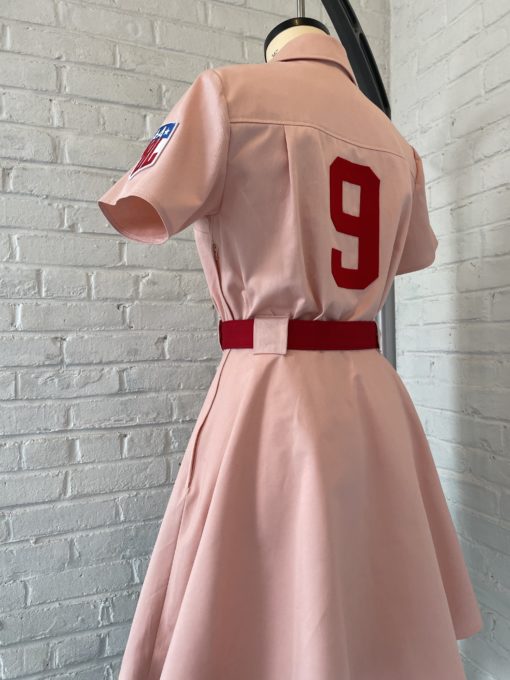
Want to be a Rockford Peach for Halloween this year? Me, too! I’m obsessed with the new version of A League of Their Own and was inspired to create this Halloween pattern hack for you. You all loved the photos and video I posted on Instagram, so here is a run-down (and video tutorial!) on how to create this peachy pattern for yourself.
One of my favorite things to do at Charm is to transform our existing patterns in new ways. All it takes is a little imagination, a muslin or two, and you can turn a pattern like the Presley Shirt into your favorite All-American baseball uniform. The Peaches uniform has an overlapping asymmetrical shirt-style bodice with a flared skirt and a side zipper, so any blouse and flared skirt pattern can be your starting point.


This tutorial will walk you through how I reimagined this pattern, but there are lots of ways to create this look. Use your imagination and the supplies you have on hand, and you’ll be swinging it out of the park yourself!
Resources
- Presley Shirt pattern (available to Patreon members)
- Lamour Dress three-quarter circle skirt pattern – alternatively, you can use the free Charm Circle Skirt pattern and remove some flare from the hem
- Peachy-pink twill fabric for the dress
- Red twill fabric for the belt
- Thread to match
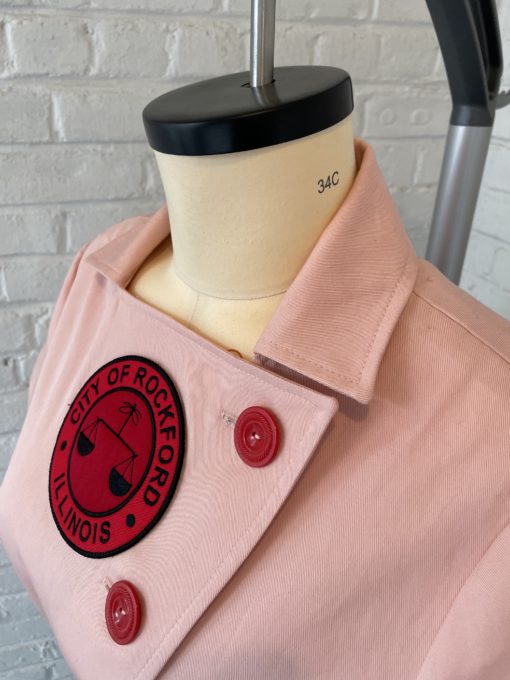
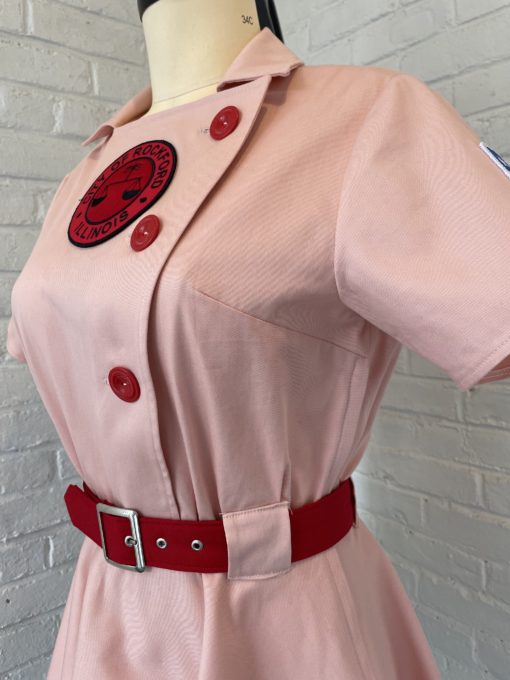
- Rockford Peach patches – I found these and these on Etsy
- Felt or vinyl player number – I made my own using wool felt and a Cricut machine, but you could try these on Etsy
- Three 1-inch red buttons
- Silver belt buckle
- 14-inch zipper
- Red baseball cap
- Red knee socks
- Black sneakers
Please watch the accompanying tutorial video below to see these steps in action! And then read through the description below.
Presley Pattern Alterations
Shorten the pattern at the waist. I made my bodice end at the natural waist, plus an extra inch for blousing. (This conveniently happened to be at the marked length adjustment line on the pattern!) Draw a line ⅝ inch below the length adjustment line at the waist on the shirt front and back. Cut the pattern at this line.
Add a bust dart to the Presley Shirt (optional, best for D cup sizes and above). Hold the shirt front pattern piece up to your body to find your apex and desired placement for a bust dart. (My dart starts 1 ½ inches below the underarm.) Draw in your dart line, ending at the apex. Draw a second line that starts a third of the way up the armhole, and connect it to your apex. Draw a vertical line, parallel to the grainline, from the apex to the waist. Cut along the vertical line from the waist to the apex, then continue cutting along the upper dart line, leaving a hinge at the armhole edge. Cut the dart line from the side seam, leaving a hinge at the apex. Swing the dart out as for a full bust adjustment, keeping the vertical cut lines parallel to each other. (I added ½ inch in the vertical gap for a D cup; you may want more or less depending on your cup size. The commonly suggested amount is ½ inch per cup size). This will spread the dart and lower the section closest to the side seam. Tape your pattern pieces into place, making sure the vertical gap is parallel. Draw in your new dart legs from the side seam, ending about 1 inch before the apex. True the dart by folding the dart closed and cutting your new side seam.
True the waistline by drawing a line from the lower pattern piece toward center front, and lengthening the center front line down to meet it.
At this point, you may find it helpful to retrace your pattern piece to continue with the pattern alterations.
Do a narrow shoulder adjustment for a more feminine look (optional). I narrowed my shoulder ½ inch, using the slash-and-spread method (here’s a great blog post on shoulder adjustments).
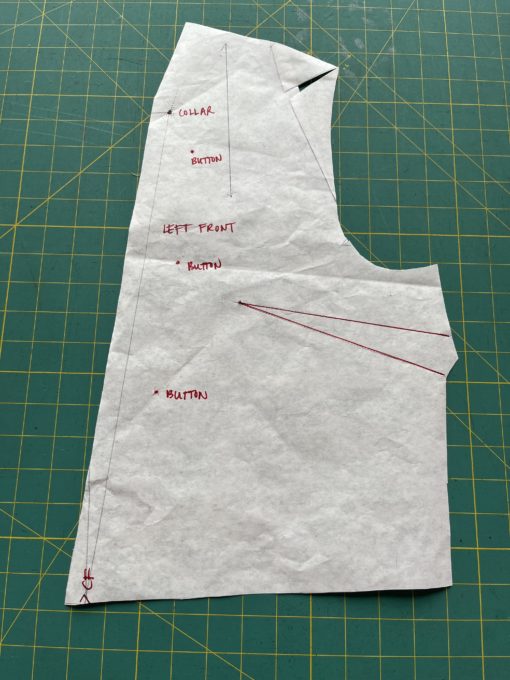
Draft the shirt front overlap and new neckline. Draw a line on the shirt front, starting at the inner shoulder seam line, traveling at a right angle to the shoulder seam, down toward the shirt center front. Walk the collar sew line along this line, starting with the notch on the collar meeting the shoulder seam. Mark the collar circle on the drawn line; this will be your new collar end point.
With a piece of paper underneath the pattern piece, draw a line from this new collar end point perpendicular to the center front and extending off the pattern piece by 3 inches. Extend the waistline by 1 inch past the pattern piece. Draw a line between these two points to create the new asymmetrical front opening.
Draw in a ⅝-inch seam allowance at the new neckline and front opening. This pattern piece is now the right shirt front (overlap side).
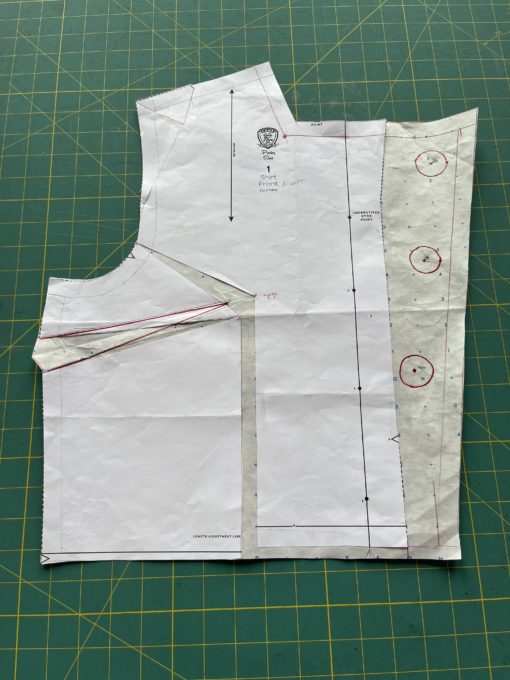
For the left shirt front (underlap side), trace a mirror image of the right shirt front, being sure to transfer all markings and the center front line. On the left shirt front, draw a line starting at the collar end point and ending at the center front at the waistline. Add ⅝ for the seam allowance and cut off the excess.
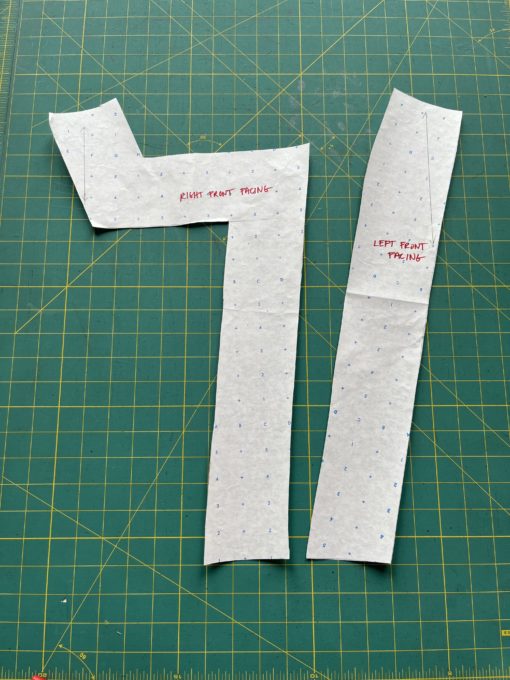
Draft new facings for the right shirt neckline/front opening and for the left shirt front opening at 3 ¼ inches wide (2 inches plus ⅝ inch seam allowance on either side). Transfer the grainlines from the shirt pieces to the facings.
Skirt Pattern Alterations
Shorten the skirt to mid-thigh length (mine is 18 inches). Cut the skirt back on the fold. Move the back zipper to the left side.
That’s it for pattern alterations! Though it may seem like a lot of steps, the results are truly worth it. When you’re ready, move on to part two: sewing instructions!