Sew Along
B6556 Sew Along #2: Full Bust Adjustment
Jun
Welcome back to the sew along! As I wrote in my last post, if you are a C cup or above you will most likely need to do a Full Bust Adjustment (FBA) on your front bodice pattern piece before you make your muslin. I’m starting with the size 10, and I want to add 2″ to the bust. This means I will be doing a 1″ FBA (because we’re only working on one side of the pattern, the amount will double when cut out on the fold).
First, I traced my size off the tissue. I like to use a cork board surface, pattern paper on top, and then the pattern on top of that. I go over all the lines and markings with a serrated tracing wheel, which leaves little dots for me to connect on the pattern paper. 
Make absolutely sure to transfer all darts, notches, and markings.

It’s helpful to use a ruler make sure your transferred lines are straight.

Don’t forget to label your pattern piece!
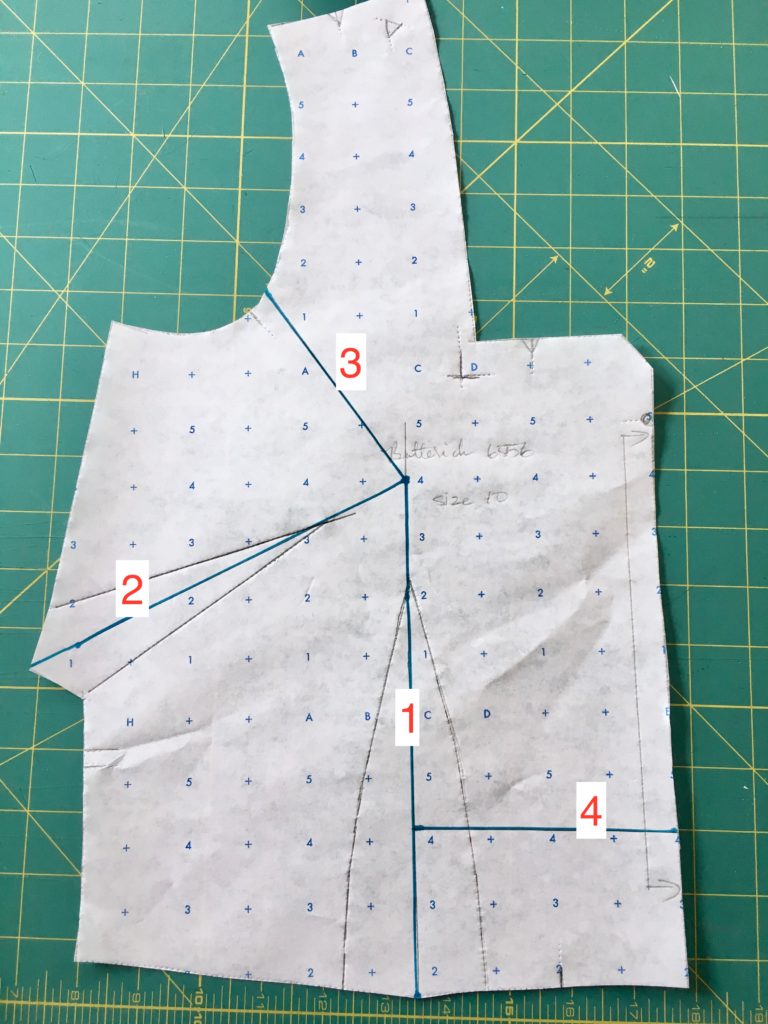
Now we’re going to draw in the necessary slash lines for the FBA:
1) vertically through the center of the waist dart
2) horizontally through the center of the bust dart
3) an angled line to the armhole (about 1/3 of the entire length of the armhole, mine is about 1/4″ above the armhole notch)
4) a horizontal line connecting the center front to about halfway up the waist dart

Next, cut a line from the waist dart up to the armhole, but leave a little bit of paper at the armhole to act as a “hinge” when the paper is spread.

Next, cut across the bust dart, leaving another hinge where it meets your first slash.

Lastly, cut all the way across the center front horizontal line.

Put some clean paper behind the slashed pattern. Spread the bust and waist darts the required amount (1″ in my case). Pull the lower right piece down until it is level with the rest of the pattern at the waistline.

Re-draw the dart lines so that the legs meet at a new point, halfway between the slashes.

Finally, you’re going to “true” the darts at the edges of the pattern. Fold each dart as it will be sewn and pressed: fold the bust dart with the body of the dart facing down, fold the waist dart with the body of the dart facing center front. With the dart folded closed, use a tracing wheel over the edge of the pattern (in this case, the side seam), tracing through the folded dart. When you open the dart back up, you’ll have trued lines to follow, which shows you where to cut the pattern.


Now you’re ready to test in muslin! I honestly have no idea how this is going to work on me at this point, and I anticipate needing to change the dart placement. But that’s easiest to see on the body, so I will check it out in a tissue fitting or muslin.
Next up either tomorrow or Saturday: sewing and fitting your muslin!